
Triaging incidents in the office
Use the Incidents page to filter, review photos, and mark incidents actioned.
Every incident — logged on the web or by the crew on mobile — lands in one list at Incidents. The sidebar carries a badge with the count still needing action.
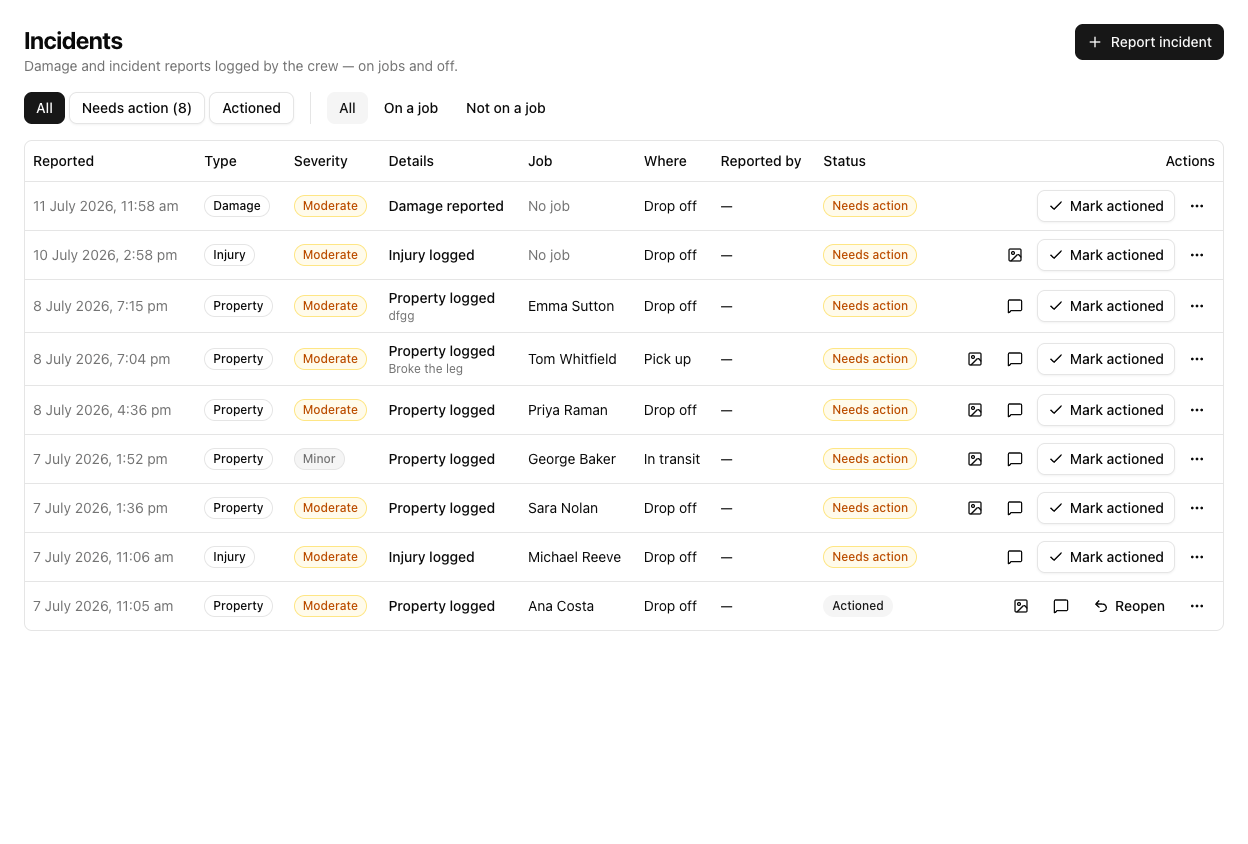
Filtering
Two filter rows:
- All / Needs action / Actioned — the "Needs action" button shows the outstanding count, e.g. Needs action (8).
- All / On a job / Not on a job — whether the incident is linked to a job.
The status is displayed as "Needs action", not "New". The underlying value is new, but you will never see the word "New" here — so filter and read by "Needs action".
The table
Columns: Reported (date and time), Type, Severity, Details, Job, Where, Reported by, Status, Actions.
There is no incident detail page. You work from the row:
- A photo icon opens the incident's picture in a dialog.
- A message icon starts a customer follow-up (job-linked incidents only).
- Mark actioned clears it; a Reopen appears once actioned.
- The ⋯ menu has Edit and Delete.
Marking actioned
Mark actioned decrements the sidebar badge. It does not make the row vanish from the default All view — the row stays, its status flips to Actioned, and you can Reopen it. To see only what is left, use the Needs action filter.
Tutorial: clear the morning's incident queue
The badge says eight need action. Work through them.
On Incidents, click Needs action. Now you are looking only at the outstanding ones, in reported order — not the whole history.
Scan the Severity column. A Major injury is not the same queue position as a Minor scratch. Deal with the serious ones before the cosmetic ones, regardless of what arrived first.
Click the photo icon on a damage row. A description and a picture are different things — "scratched table" covers both a scuff and a gouge. Look before you decide what it is worth.
Switch to On a job. These are the ones you can follow up with a customer directly. The Not on a job ones — a near miss in the yard, say — are internal and handled differently.
For a job-linked damage claim, use the message icon on the row to email or text the customer with the incident details. See following up with a customer.
Click Mark actioned only when the thing is actually dealt with — not just read. It drops the badge count. The row stays visible in All and can be reopened, so "actioned" should mean done, not "seen".
A duplicate or a mistake? Use the ⋯ menu — Edit to correct it, Delete to remove it. A test incident someone logged while learning the app is a Delete, not an Actioned.
A job's own Incidents tab shows only that job's incidents. The Incidents page is the whole picture across every job — use the page for triage, the tab for a single job's history.