
Sending an email from a job
Send a formatted email to a customer from the job page, with photos attached if you need them.
Email uses the same Send Message panel as SMS — open the job, click Send Message in the header, then switch Message Type to Email.
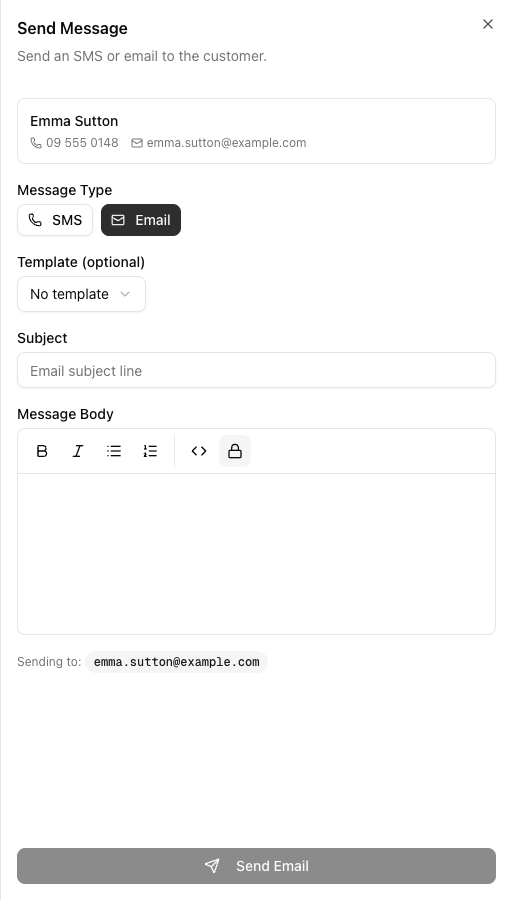
Switching Message Type clears the subject and body. Choose SMS or Email before you write, not after — flipping the toggle to compare will throw away what you have typed.
The fields
Template (optional) — filtered to templates whose Category is Email. An SMS template will never appear here.
Subject — required in practice. Variables work: Booking confirmed — your move on {{JobStartDate}}.
Message Body — a rich-text editor with bold, italic, bullet and numbered lists, an HTML source toggle (<>), and a placeholder lock.
The placeholder lock
When a template fills the body, the resolved values render as protected pills, and they are locked by default. The lock icon in the toolbar toggles this — the tooltip reads "Placeholders locked — click to allow editing them."
The lock exists to stop you accidentally deleting half a customer's name while editing around it. Unlock it only when you deliberately need to change a substituted value.
Attaching photos
If the job has photos, an Attach Photos section appears below the body: a grid of the job's images with the prompt "Tap photos to attach them to this email." Click to attach.
Photos are email only. In SMS mode the section reads "Photos can only be attached to emails." If you need to send a customer a picture of the damage, or proof of a delivered load, it has to go by email.
Send
The footer shows Sending to: with the resolved address, and the button reads Send Email. Like SMS, the message is queued — you get a "Email queued for sending" confirmation, and it appears on the job's Messages tab.
Replies
Your reply-to address is set at Settings > Email & SMS, not on a company details page.
Do not assume a customer's email reply will land on the job. Inbound SMS replies are matched to jobs automatically. Email threading back onto a job works through the Gmail or Outlook integration — connecting a shared inbox under Settings > Integrations is what captures replies and threads them. A plain reply to your reply-to address is not guaranteed to appear on the job.
Where email threading is working, inbound emails on the Messages tab carry a Reply button, so you can continue the thread without leaving the job.
Tutorial: email an estimate with photos
The customer wants a written quote and pictures of the access problem you found.
Open the job's Attachments tab and upload the photos — drag and drop, or Choose Files. The Attach Photos picker only shows images that are already on the job, so this has to happen first. (Your crew's photos from the mobile app are already here.)
Click Send Message, then switch Message Type to Email straight away — before typing. Switching later wipes the box.
Pick your estimate email from Template (optional). Subject and body fill in with the job's real figures. Only Email-category templates are listed.
Check the numbers that came through. A blank where a price should be means the job is missing that data — the fix is on the job's Costs or Appraisal tab, not in this email.
Click into the body and add your note about the stairs. Notice the substituted values are locked pills — you can type around them safely without breaking them. Leave the lock on; you have no reason to edit a resolved value here.
In Attach Photos, click the two access photos. They highlight as attached.
This is the moment email earns its place over SMS. You cannot do this in a text — the same message in SMS mode would show you "Photos can only be attached to emails."
Confirm the Sending to: address, then click Send Email.
The Messages tab logs it as Email to customer with a status badge. If you have Gmail or Outlook connected, their reply threads back here with a Reply button. If you have not connected an inbox, watch your own mail — the reply will not appear on this job by itself.