
Adding your trucks
Add trucks to VanMan with colours, capacity, team leaders, and weekly availability.
Each truck in VanMan represents a vehicle you can assign to jobs. Setting them up accurately is what makes the calendar readable, keeps you from double-booking, and warns you when a load will not fit.
Trucks live under Fleet > Trucks in the sidebar — not under Settings.
Choose distinct, contrasting colours. Your truck's colour is how its jobs are marked on the calendar, so two trucks in similar shades are genuinely hard to tell apart at a glance. VanMan gives you twelve preset colours, which comfortably covers most fleets.
Go to Fleet > Trucks and click New Truck. A dialog opens with the vehicle's details.
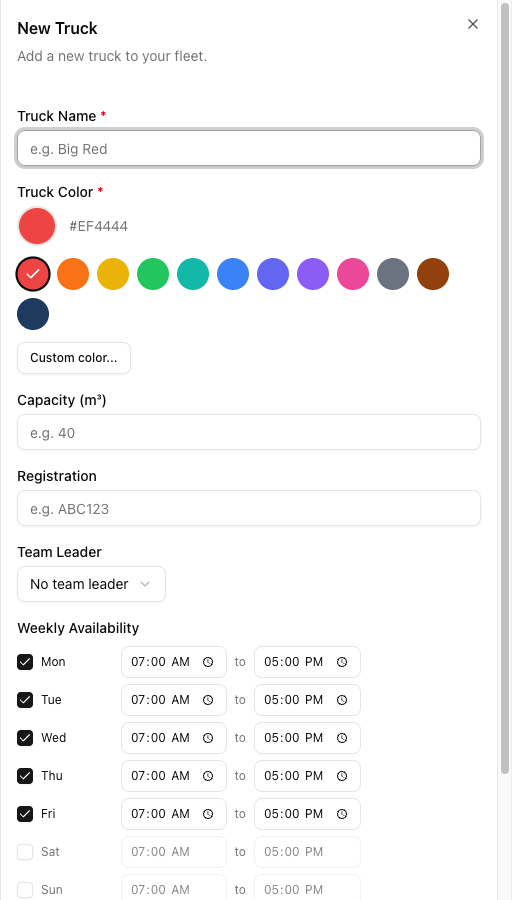
Truck Name is required. Use whatever your team already calls it — the fleet in these examples uses names like Keith, Missy, and Atlas rather than "Truck 1". The name appears on the calendar and in the job form, so make it the word your dispatcher would say out loud.
Truck Color is also required and defaults to red (#EF4444). Pick from the twelve presets, or click Custom color... to enter a specific hex code if you run branded colours. By default this colour shows as a bottom border on the truck's job blocks on the calendar — it only fills the whole block if someone has turned on Use truck color as job background under Settings > Calendar.
Capacity is in cubic metres. A standard two-bedroom truck sits around 20 m³; a large furniture truck can be 32 m³ or more. Accurate figures matter because VanMan compares a job's estimated volume against the assigned truck.
Registration identifies the vehicle for compliance and reporting. It is optional — a fleet can carry a placeholder entry with no registration for jobs that need a crew but no vehicle.
Team Leader defaults to No team leader. It is optional.
This does not put anyone on a job. Assigning a truck to a job never adds crew — crew is always added by hand on the job's Crew row. What the Team Leader field actually does is decide who receives push notifications for this truck's jobs, and scope the "my trucks" figures on the dashboard.
Weekly Availability is where you say which days this truck runs and between what hours. Each day has a checkbox and a start/end time, defaulting to Mon–Fri, 07:00 AM to 05:00 PM, with Saturday and Sunday off. If a truck only runs weekends, or knocks off at 3pm on Fridays, set it here — this drives the Truck Availability figures on your dashboard.
Availability is reporting, not a guard rail. VanMan will happily let you book a truck outside its available hours, or on a day it is switched off — nothing blocks it and no warning appears. Treat these hours as the dashboard's view of your capacity, not as a booking restriction.
Click Create Truck to add it to the fleet. Repeat for each vehicle.
Editing and removing trucks
The trucks list shows Color, Truck Name, Registration, Capacity, and Team Leader, with a search box for finding a vehicle by name or registration. Click a row to edit it, or use the ⋯ menu for Edit and Delete.
There is no "deactivate". The ⋯ menu offers exactly two actions: Edit and Delete. If you want to take a truck off the road temporarily, there is no switch for it — edit its Weekly Availability to nothing, or leave it and simply stop assigning it.
Delete is a soft delete — the record survives, but the truck disappears from the app. Two things worth knowing before you click it:
- VanMan blocks you if the truck has upcoming jobs. The dialog warns "This truck has N upcoming job(s). Reassign them first." and the Delete button disappears until you do. You cannot delete a truck out from under scheduled work.
- Undo lives for about ten seconds. The success toast carries an Undo action, and that is the only way back. Once the toast goes, there is no restore button anywhere in the app.
Tutorial: add a second truck to a growing fleet
You have been running one truck and just bought a second. Here is the setup, end to end.
Go to Fleet > Trucks. Your existing truck is in the list. Click New Truck.
In Truck Name, type Atlas. It is a bigger truck than your first, and a name is easier to dispatch with than a number.
Say your existing truck is orange. Click the pink preset — clearly distinct on a calendar at a glance. Avoid the red default if you already run an orange truck; at small sizes on a busy week they blur together.
Set Capacity to 24.75. Use the actual figure from the vehicle's specs rather than rounding — VanMan compares this against estimated job volume, and rounding up is how you end up with a load that does not fit.
Set Registration to HKM692.
Set Team Leader to the crew member who will normally run this truck.
Be clear about what this buys you: it does not add them to jobs. It means they get the push notifications for Atlas's work, and Atlas counts as one of "their" trucks on the dashboard. You will still add them as crew on each job by hand.
Leave Mon–Fri checked at 07:00 AM–05:00 PM. Tick Sat and set 08:00 AM–12:00 PM — you run Saturday mornings only. Leave Sun unchecked.
Click Create Truck. Atlas appears in the list in pink. Open the dashboard: Atlas now shows under Truck Availability. Open the job form: Atlas appears as a pink chip in the truck multi-select, ready to assign — and because a job can take more than one truck, you can now book a two-truck move.
A truck with no registration and no capacity is a useful trick for jobs that need crew but no vehicle — packing-only jobs, for instance. It keeps them on the calendar without pretending a truck is tied up.