
Connecting Xero
Link your Xero organisation to VanMan for invoicing, account code mapping, and sync.
Connecting Xero lets you raise invoices from completed jobs and push them straight into your accounts, without re-keying anything. Xero lives under Settings > Integrations, alongside the Gmail and Outlook integrations.
You need Xero administrator access to authorise the connection. If you are a Standard or Invoice Only user in Xero, ask your Xero admin to either change your role or complete this step for you. In VanMan, you also need a role that can edit settings — Operators cannot connect or disconnect integrations.
Connect
Go to Settings > Integrations and find the Xero Accounting card. Click Connect to Xero. You are handed off to Xero's login and consent screen.
Sign in to Xero and grant VanMan the permissions it asks for. If your Xero login covers more than one organisation, VanMan asks which one to use. It connects to a single Xero organisation at a time, so choose the entity that matches the jobs you run.
Back in VanMan, the Xero card now reads Connected, names the organisation it is connected to, and shows a health indicator with the time it was last checked.
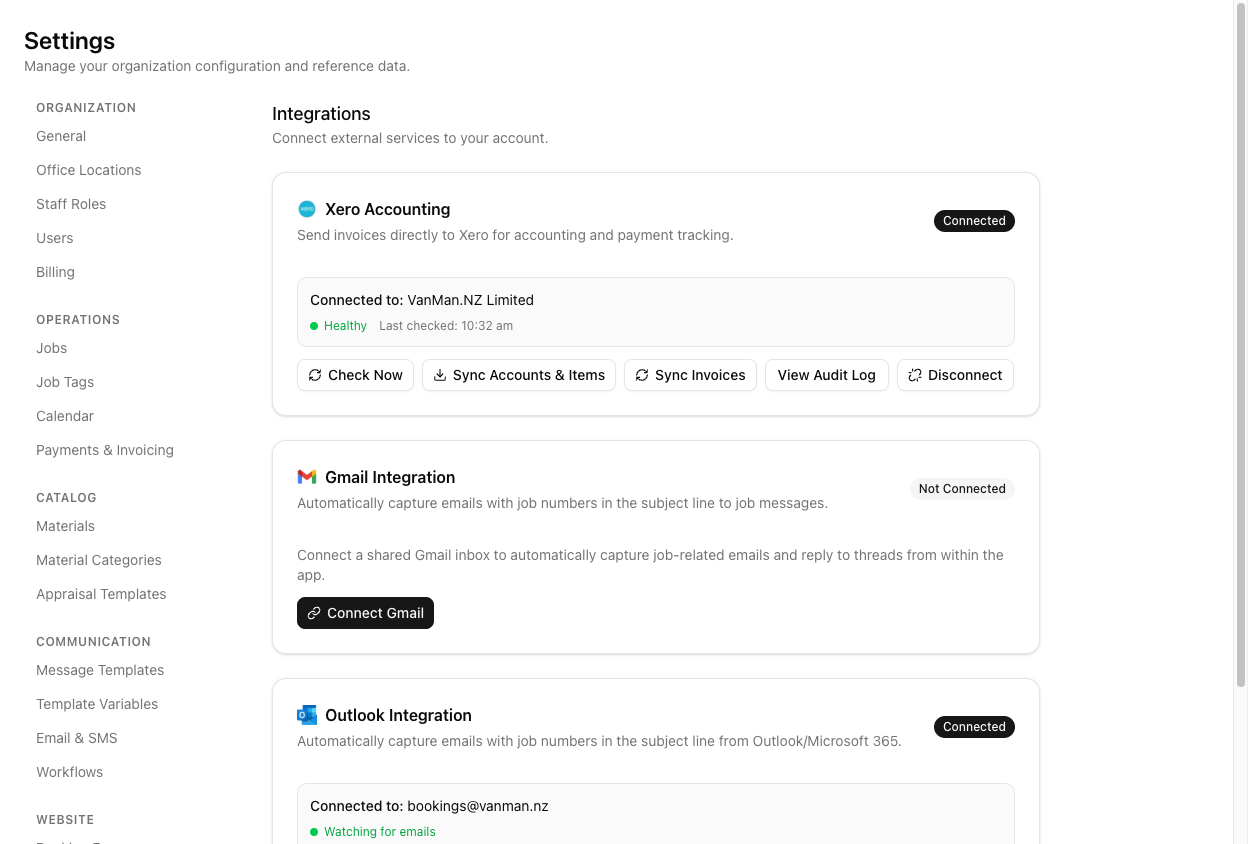
Click Sync Accounts & Items. This fetches your Xero chart of accounts and inventory items so they are available to pick from when you map your catalog.
Map your account codes
This is the step people miss. VanMan does not ask you for a single default revenue account after connecting. Account codes are set on your catalog instead, at two levels:
- Material Categories — each category (Service, Travel, Pack & Prep, Fuel & RUCs, Materials) has an Invoice Account Code. Set under Settings > Material Categories.
- Materials — an individual material can carry its own account code and be linked to a specific Xero item. Set under Settings > Materials.
Set the code at the category level and everything in it inherits sensible behaviour; override on the individual material only where you need to.
Whether invoices arrive in Xero as Draft or Authorised is not set here. It is the Xero Invoice Status option under Settings > Payments & Invoicing, in the Invoicing section — along with Auto-send Invoices, which pushes an invoice automatically when a job completes.
What the connected card gives you
- Check Now — re-tests the connection and updates the health indicator.
- Sync Accounts & Items — refreshes your chart of accounts and inventory items from Xero.
- Sync Invoices — pulls invoice state back from Xero, so payments recorded there show against your jobs.
- View Audit Log — every sync action and its outcome. This is the first place to look when an invoice does not appear in Xero.
- Disconnect — revokes the connection, with a confirmation prompt.
Disconnecting does not delete historical invoice data in VanMan, and you can reconnect later. Switching Xero organisations means disconnecting and reconnecting.
Tutorial: connect Xero and get one invoice through
Take it from nothing to a verified invoice in Xero.
Sign into Xero and confirm you are an administrator on the organisation you want to connect. Doing this first saves you a failed round trip through the consent screen.
In VanMan, go to Settings > Integrations and click Connect to Xero on the Xero Accounting card. Sign in, approve the permissions, and pick your organisation if prompted. You land back on the Integrations page with the card reading Connected to: your organisation.
Click Sync Accounts & Items. Without this, the account code pickers in your catalog have nothing to offer.
Go to Settings > Material Categories. Edit the Service category — the one carrying your crew-and-truck hourly rate, and therefore most of your revenue — and set its Invoice Account Code to your sales account (commonly 200). Do the same for Travel and Materials.
This is what determines which account each invoice line hits. Skip it and your lines land wherever Xero defaults them.
Go to Settings > Payments & Invoicing. Set Xero Invoice Status to Draft while you are getting started. Draft means a human approves in Xero before anything is final — the right setting until you trust the mapping.
Open a completed job, go to its Costs tab, and generate the invoice. Review the preview: check the line items, the amounts, and the GST. Then click Send to Xero as Draft.
Open Xero and find the invoice under Draft. Confirm three things: the line items match, the amounts and GST are right, and each line has hit the account code you mapped. If the accounts are wrong, the fix is in Material Categories, not in the invoice.
If the invoice never appears in Xero, go back to Settings > Integrations and click View Audit Log. It records each sync attempt and why it failed — a far faster answer than retrying blind.
Once a few invoices have gone through clean, consider switching Xero Invoice Status to Authorised and turning on Auto-send Invoices so completed jobs invoice themselves. Do not start here — start with Draft and earn the automation.
The health indicator on the Xero card goes stale rather than loud. If invoices quietly stop syncing, click Check Now — an expired or revoked Xero authorisation shows up there before anywhere else.