
Sending your first SMS
Set your SMS sender number, build a reusable template with real variables, and send from a job.
VanMan sends SMS and email to customers from inside the job, using reusable templates with variables that fill themselves in from the job's real data. This walks through the sender setup, building a template, and sending your first message.
You do not connect an SMS provider yourself. There is no Account SID or Auth Token to paste — the SMS gateway is configured for you at the platform level. All you set is the number your messages appear to come from.
Set your sender details
Go to Settings > Email & SMS. It holds three fields, and they save automatically:
- From Email — the default sender address for outgoing email.
- Reply-To Email — where customer replies to your emails land.
- From Number — the phone number your SMS messages are sent from.
That is the whole SMS configuration.
Build a template
Templates live under Settings > Message Templates, which is a separate page from Email & SMS. Click New Template.
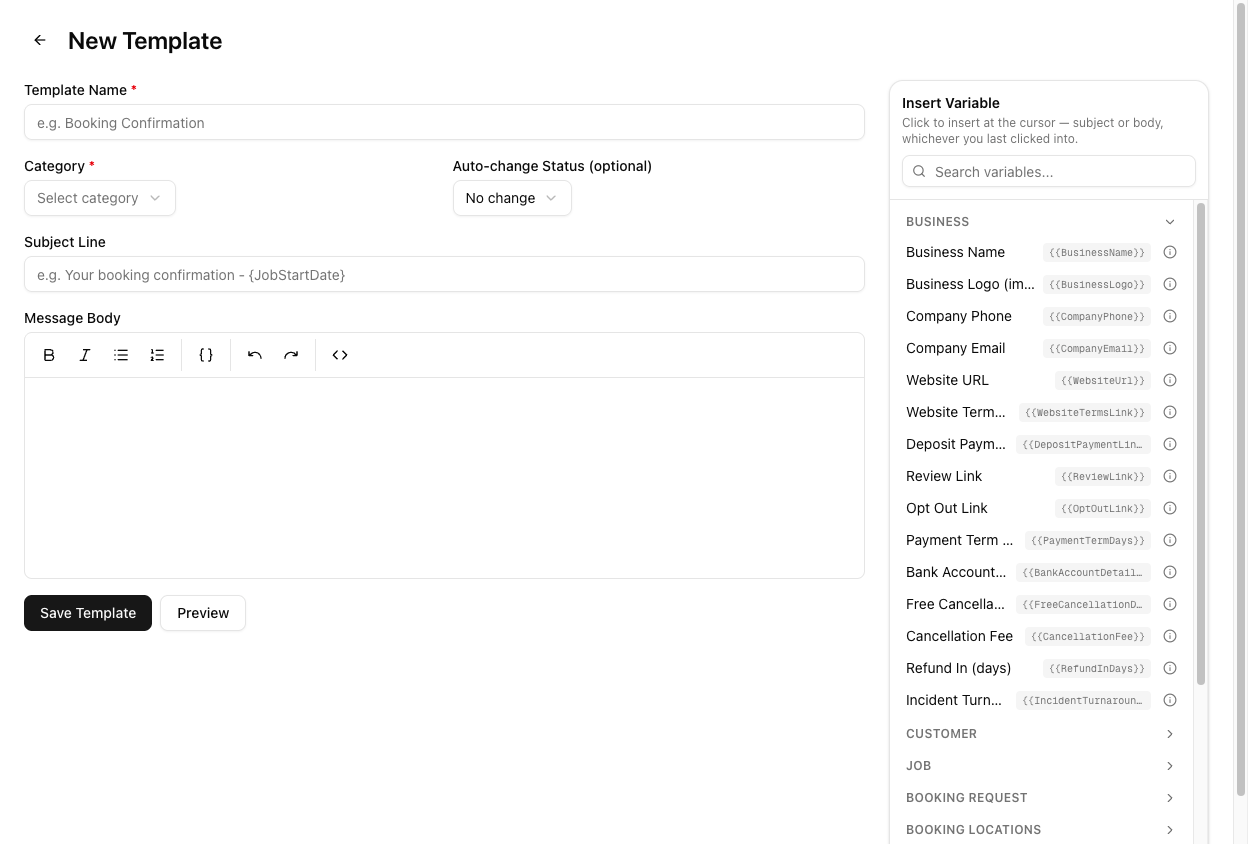
The editor gives you:
- Template Name (required) — how you will find it in the send dialog.
- Category (required) — SMS, Email, or Estimate. Pick SMS and the template becomes available when sending an SMS.
- Auto-change Status (optional) — defaults to No change. Set it and sending this template moves the job to that status automatically, which is how a "Booking confirmed" message can advance the job without a second click.
- Subject Line — used by email templates; leave it alone for SMS.
- Message Body — a rich-text editor with an Insert Variable button and a preview.
Variables
Variables are PascalCase inside double braces — {{CustomerName}}, not {{customer_name}}. The Insert Variable panel on the right of the editor is the definitive list; click one and it drops in at your cursor. It is grouped into Business, Customer, Job, Booking Request, Booking Locations, Incident, Job Financials, Invoice, Quote, and more.
The ones you will reach for most in an SMS:
| Variable | Fills in with |
| --- | --- |
| {{CustomerName}} | The customer's full name |
| {{CustomerFirstName}} | Just their first name — friendlier for SMS |
| {{BusinessName}} | Your trading name from Settings → General |
| {{CompanyPhone}} | Your company phone number |
| {{JobNumber}} | The job's reference |
| {{JobStartDate}} | The scheduled date |
| {{JobStartTime}} | The scheduled start time |
You can mark a variable as private under Settings > Template Variables, which highlights it as internal-use in the editor, and give it a help description that shows as a tooltip. Useful for keeping cost variables out of customer-facing messages by mistake.
Send from a job
Open any job and click Send Message in the header. The dialog shows the customer's name, phone, and email, then:
- Message Type — toggle between SMS and Email.
- Template (optional) — pick your template, or leave it on No template and write free-hand.
- Message Body — the text, with variables already resolved against this job's data.
The dialog confirms the destination (Sending to: …) before you commit. Click Send SMS.
Sent messages are recorded on the job's Messages tab, along with any replies.
Tutorial: build and send a day-before reminder
Create a reminder template from scratch and send it to a real job.
Go to Settings > Email & SMS and confirm From Number is set. If it is blank, your SMS has no sender and will not go out. There is nothing else to configure here.
Go to Settings > Message Templates and click New Template. In Template Name, type Day-before reminder (SMS). Set Category to SMS. Leave Subject Line empty — SMS has no subject.
Click into Message Body. Now use the Insert Variable panel rather than typing variable names from memory — this is the step that prevents the most common mistake. Search the panel for Customer First Name and click it. Then type the rest around it:
Hi {{CustomerFirstName}}, just confirming your move tomorrow, {{JobStartDate}}, from {{JobStartTime}}. Any questions, call us on {{CompanyPhone}}. — {{BusinessName}}
Every one of those came from the panel. If you had typed {{customer_first_name}} it would not resolve.
Click Preview to see the message with sample data filled in. Check the length — long SMS messages split into multiple parts and cost more. This one comfortably fits.
Leave Auto-change Status on No change. A reminder should not advance the job's state; a booking confirmation would.
Click Save Template. It now appears in the templates list with Category SMS.
Open a job scheduled for tomorrow and click Send Message. Set Message Type to SMS and pick Day-before reminder (SMS) from the template dropdown. The body fills in with that job's real customer name, date, and time.
Before sending, read the resolved text. Every variable should have become a real value — if you see {{CustomerFirstName}} still sitting there literally, the variable name is wrong or the job has no contact linked.
Confirm the Sending to: number is right, then click Send SMS. Open the job's Messages tab: the message is logged there, and any reply from the customer threads back into the same place.
To send reminders automatically rather than by hand, attach the template to a workflow under Settings > Workflows so it fires on a trigger instead of a click.